

INTRODUCTION
Blockchain simplified
Blockchain technology can be defined as an open, distributed ledger that records transactions between two or more parties efficiently (peer-to-peer) in a verifiable (time-stamped) and permanent way (immutable).
It is an emerging way for businesses, industries, and governments to make and verify transactions, streamlining business processes, saving money, and reducing the potential for fraud or error almost instantaneously.
When to use blockchain?
Blockchain technology has three primary use cases - record keeping, transfer of value and automated logic - increasing from the most basic application to the most complex.
Two ways to use Datasker
We have designed Dasker to be used two ways:
Defined Entry Creation
Manual Entry Creation
Defined Entry Creation
An easier and more consistent way to enter data is to use a Defined Entry Definition. Defining your entries not only makes the data more consistent and structured but it also helps achieve seamless interoperability between legacy systems and Datasker’s blockchain layer. For regularly used or high value data we recommend using this approach.

Manual Entry Creation
Is suitable for occasional or un-automated tasks, which are done infrequently. If the data is a one-off and is of relatively minor importance, it might be appropriate to create a completely ad-hoc entry. After going to the Create New Entry page you can select "Manually Create Entry". After entering your own custom Entry Name, you can add a name and value for each data field you wish to store.
STEP ONE
GETTING STARTED
What is a Ledger?
A ledger is a collection of data about a given subject or business area. It can hold multiple different types of entries. Entries don't all have to be about the same events or transactions, but they should be of interest to the same people or business entities.
For example, if you created an ESG compliance ledger for a construction company, it might include a number of different ESG compliance events and interactions, such as site inspections, lab test reports, water usage reports, and more.
When you begin using Datasker you may start with one ledger, and can continue to add additional ledgers when needed.

Creating a Ledger
To create a new ledger all you have to do is go to the new ledger form and enter a name for your ledger. You can also add a description to make it more clear to other people (as well as yourself) what data this ledger is intended to store.
Click on "Create your new Ledger" and the core ledger information will be saved to your dashboard and ready for you to begin customising for your needs.
STEP TWO
DATA DEFINITIONS
Defining Data
By default, your ledger can accept any data sent to it, either through a manual form, or sent by API integration. However most people are likely to have specific sets of data that they want to send regularly. Setting these events as a data definition allows them to be validated and provides more structure and consistency.
Definition Enforcement
By default, your ledger does not enforce or check for anything about the contents of your data. It can be completely unstructured. Even if you create a data definition, the default behaviour is not to enforce this.
There are three enforcement modes:
No Enforcement - All data you send to your ledger is accepted.
Partial Enforcement - Data validation is run on any defined entries, but undefined entries are allowed.
Strict Enforcement - Data validation is mandatory, and undefined entries are rejected.
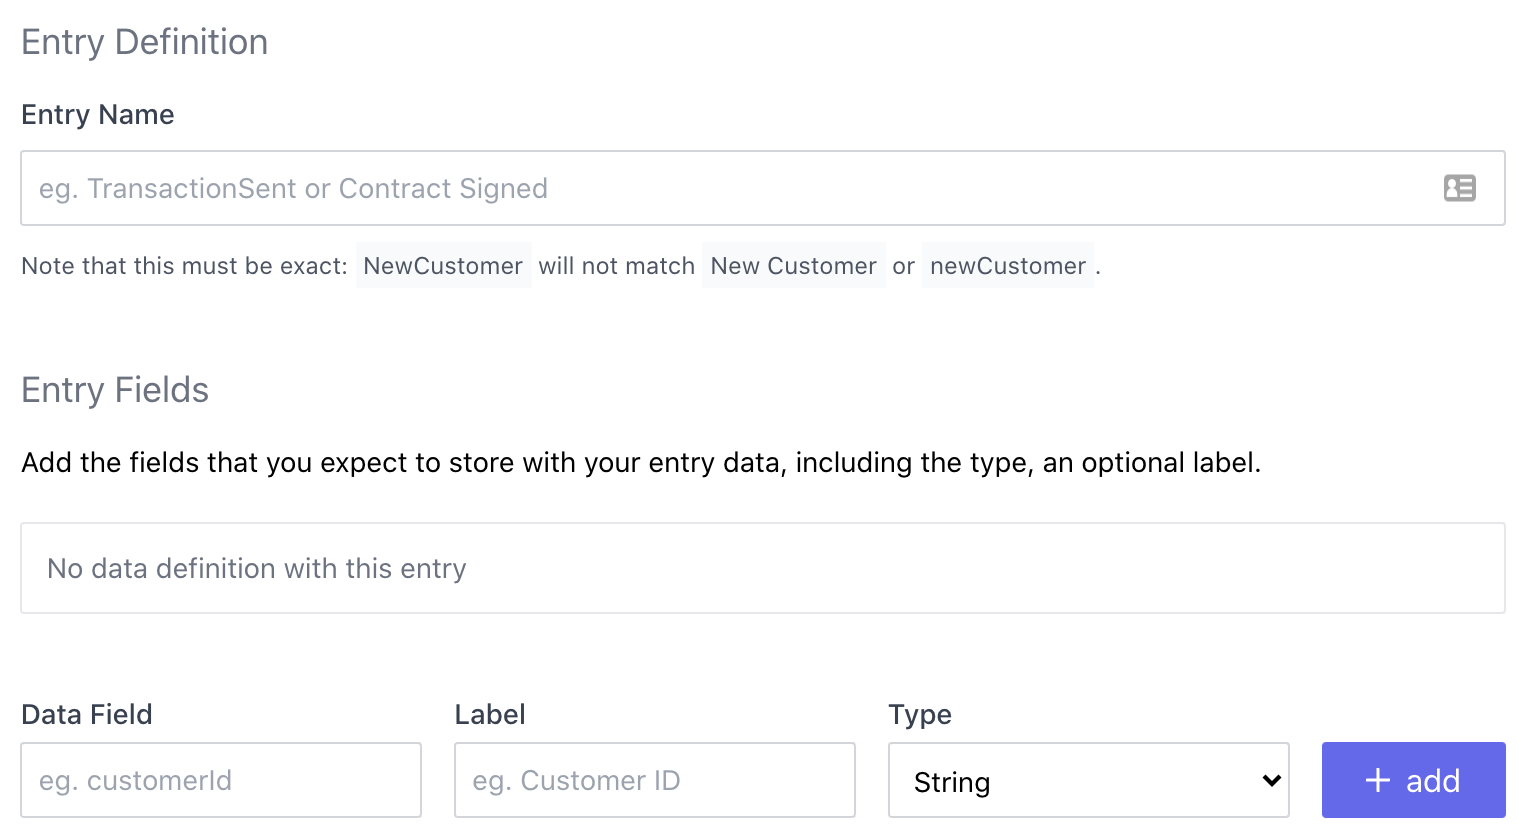
Creating an Entry Definition
On the Create an Entry Definition form, the most important field is the Entry Name field. This will be the name of the type of data you will be defining. For example, a new user signup event might have an entry name of UserSignup, and this must be consistent and correct.
Entry Definition Fields
You can also add fields to your data structure, allowing you to define what will be in the data sent. This includes both the name, such as creation_time an optional label ie Creation Time can be used for display purposes, and the field type - in this case a Date And Time. You can add as many fields as you need.
STEP THREE
DATA ENTRY RULES
Entry Rules
Entry Rules allow you to validate data being entered into the ledger, to ensure that it will create useable, properly formed and structured data. Rules are only able to be applied to Defined entry types, so you must set up a data definition first.
Viewing Rules
You can view all of the applied rules by first navigating to a data definition on any of your ledgers. This will then list all of the rules.
From this view you can also edit and delete the created rules, by clicking the buttons visible on hover.

Creating New Rules
At the bottom of the rules list is the form to create a new rule. You can set the field you want to put the rule on, and then what rule to apply. Most rules also allow setting a value, such as the time before, or a minimum length.
You cannot create a duplicate rule on any field, so you cannot have a two of the same rule type on a field - for example, it can't be required twice.

STEP FOUR
API INTEGRATION
Integration
Integration is a highly technical process, and should be undertaken by skilled developers familiar with HTTP request protocols. The overall intent is that an event in your system, such as a new user, or an important transaction, triggers your application to send an event request to your custom Ledger endpoint. This then stores the record, which is archived for later potential auditing, or can be retrieved by you from another custom endpoint at any time.
The event is added by using the required date to the Ledger with a specific payload to a defined endpoint. The raw CURL request is provided here.

Request Details
The following details the request that needs to be sent. Note that much of the data is custom to your specific needs and in line with your Entry Definitions.
Note also that if your ledger is configured for it, or your data violates your defined Entry Rules then your request will be rejected with a 422 Unprocessable Entity, with further information about why it was rejected. You should be ready to detect this status code and potentially resubmit corrected data.
